- How to Claim The Trusted Cert Form?
- Go to the Dashboard → Navigate to the Setting on Top Right corner → Go to the Trusted Form Claim section.
- This is a third-party validation service for claiming the Trusted Form Cert URL.
- To use this feature, enable the corresponding radio button in the system settings.
- Enter the API Token provided by the "TrustedForm" website.
- Note: This functionality is triggered only when a lead is accepted by any buyer.
- Click the Save button to complete the setup. The feature will now be ready to use.
- Additionally, navigate to the publisher edit page and check the "Trusted Form Claim" checkbox to activate this feature for the desired publisher.
- To enable it for other publishers, repeat the process by checking the same checkbox for them.
- What is Real Validation?
- Go to the Dashboard → Navigate to the Setting on Top Right corner → Go to the Real Validation section.
- This is a third-party validation service for phone verification.
- To use this validation, enable the respective radio button in the system settings.
- Select the type of validation you want to activate (phone) by toggling the appropriate option.
- Enter the API Token from the "Real Validation" website.
- Click the Save button to complete the setup. The feature will now be ready to use.
- Additionally, navigate to the publisher edit page and check the "Real Validation" checkbox to activate this feature for the desired publisher.
- To enable it for other publishers, repeat the process by checking the same checkbox for them.
- What is Email Oversight Validation?
- Go to the Dashboard → Navigate to the Setting on Top Right corner.
- This is a third-party validation service for email and phone verification.
- To use this validation, enable the respective radio button in the system settings.
- Select the type of validation you want to activate (email, phone, or both) by toggling the appropriate option.
- Enter the API Token and List ID from the "Email Oversight" website.
- Click the Save button to complete the setup. The feature will now be ready to use.
- Additionally, navigate to the publisher edit page and check the "Email Over Sight" checkbox to activate this feature for the desired publisher.
- To enable it for other publishers, repeat the process by checking the same checkbox for them.
- What is Publisher Source?
- Go to the Dashboard → Navigate to the Left-side Menu → Click on the Publisher option.
- On the Publisher Listing Page click Edit for the desired publisher. Navigate to the Sources section, where you can create and manage your sources.
- Now, include the created "source" in the lead API request.
- How To Delete Buyer API Integration From Listing Page?
- Dashboard → Left side Menu → “Buyer/Contract” option → Click on “API Integration”.
- In the API Integration Listing Page, navigate to the Act field and click the "Trash" icon button. This will allow you to permanently delete the API Integration.
- How To Upload Document In API Integration?
- Dashboard → Left side Menu → “Buyer/Contract” option → Click on “API Integration”.
- API Integration Listing Page → Edit any existing integration.
- General Information Tab → Below the Notes field → Click on “Drop files here or click to choose” → Select any Documentation and then click below "Save" button
- How To Add New API Integration?
- Dashboard → Left side Menu → “Buyer/Contract” option → Click on “API Integration”.
- Buyer API Integration Listing Page → Top Right side → “Add” button.
- Select Lead Type, Integration Name, Status and Post Type → Fill the form → Click on the “Submit” button.
- Then, in the **Integration** tab, map the buyer's field names with our field names to ensure proper mapping.
- How To Add New Buyer Campaign?
- Dashboard → Left side Menu → “Buyer/Contract” option → Click on “Campaigns”.
- Buyer Campaigns Listing Page → Top Right side → “Add” button.
- Select Lead Type, Buyer and Campaign Name → Fill the form → Click on the “Submit” button.
- Then edit new created campaign and select the integration which is you created earlier and add ping/post URL.
- How to Setup Zoho Integration
Here, you can get a "How to Setup Zoho Integration", then please follow these instructions.
- Go to Dashboard → Top Right corner → Click On "User Profile".
- Click on "Setting" Button → you get all setting of System.
- Here, you can see "Zoho Integration" section.
- Then add Zoho Client ID, Client Secret ID and Refresh Token to integrate to our system.
- How To Add Fields In Leadtype
- Yes, you can Add Fields in Leadtype .
- Dashboard → Left side Menu → Click on “Manage Leadtype”.
- Leadtype Listing Page → Select Leadtype → Click On Edit Action button.
- Leadtype/edit Page → click on Additional Fields → Add New Field → There Are 4 type of fieldtype → Select field type and Enter Label name → “Submit” button
- How to Move Setup Ping/Post To Direct Post
- Yes, you can move setup ping/post to direct post.
- Dashboard → Left side Menu → Click on “Buyer Contract → Api Setup integration”.
- Buyer Setup/Integration Listing Page → Click on Buyer Setup/Integration Table Inside Link.
- Buyer Setup/Integration Page → click on Post data using API + Buyer Field Mapping → Remove test Ping urls & Live ping url → unselect All Fields ping →“Submit” button
- How To Add New Publisher Buyer Mapping
- Yes, you can add new pubbuyer mapping.
- Dashboard → Left side Menu → Click on “Pub-Buyer Mapping”.
- Pub-Buyer Mapping Listing Page → Click on ADD Button.
- Publisher Buyer Mapping/Add Page → Fillup Information → “Submit” button
- How to Add Filter From Buyer Login
- Yes, you can add filter from buyer login.
- Dashboard → Left side Menu → Click on “API Setup Integration”.
- Buyer Setup/Integration Listing Page → Click on Live Transfer → Enter Phone number →“Add” button.
- Funds Listing Page → Fillup Fund Information → Fund Amount Limit → Add Fund Amount → Fund Description →“Submit” button.
- After that → click on Buyer Filters → Enter Filter name for filter out → “Add” button
- Click the Filter you Entered → Select Field in Dropdown → Select Operator Dropdown → Enter Value → If you Wanted Add new Row → Click that Button → Then If you want filter data → Select "Accept/Reject" Dropdown → “Save” button.
- If you want to Pause the Filter → Click that Right Tick → Buyer Filter Pause
- How to Add Funds From Buyer Login
- Yes, you can add Funds in Buyer setup.
- Dashboard → Left side Menu → Click on “Payment Setting”.
- Funds Listing Page → Fillup Your CreditCard Detail → “Save” button.
- Funds Listing Page → Fillup Fund Information → Fund Amount Limit → Add Fund Amount → Fund Description →“Submit” button.
- Your Funds Showing above the Your CreditCard Detail
- Can You Add Custom Fields Into Post Data Using API Section?
- Yes, you can add Custom Fields into the Post using the API section.
- Dashboard → Left side Menu → “Buyer/Contract” option → Click on “API Setup Integration”.
- Buyer Setup/Integration Listing Page → Top Right side → “Add” button.
- Select Lead Type → Select "Send using API" option.
- “Post using API + Buyer Field Mapping” section → End of this section → “Custom Field” option.
- And also, if you want to add one more Custom field, you can click on the “ + ” icon and get more fields for adding more custom fields.
- How To Select The Post Response Type Of Buyer Response?
- Dashboard → Left side Menu → “Buyer/Contract” option → Click on “API Setup Integration”.
- Buyer Setup/Integration Listing Page → Top Right side → “Add” button.
- Hard Code PHP section → “Buyer Response” section.
- Select Post Response Type whatever you want.
- You can respond to Buyer by JSON, XML, XML with Attribute, and String/GoogleSheet.
- How To Get Different Methods Of Sending Data Using API?
- Dashboard → Left side Menu → “Buyer/Contract” option → Click on “API Setup Integration”.
- Buyer Setup/Integration Listing Page → Top Right side → “Add” button.
- Next to the Information Section → Post Data to Buyer section → Select “Sending using API” → you can see five Methods.
- HTTP POST Method
- JSON Method
- XML Method
- Google Sheet
- Static File
- How Many Methods For Posting Data To Buyer?
- Dashboard → Left side Menu → “Buyer/Contract” option → Click on “API Setup Integration”.
- Buyer Setup/Integration Listing Page → Top Right side → “Add” button.
- Next to the Information Section → You can see this section.
- Here, Three types of Methods for Posting Data to Buyer
- Sending using API
- Send Email
- Send SMS
- How To Edit API Integration From Listing Page?
- Dashboard → Left side Menu → “Buyer/Contract” option → Click on “API Integration”.
- In the API Integration Listing Page, navigate to the Act field and click the "Pencil" icon button to edit the selected API integration.
- How To Copy Details Of Buyer Campaign?
- Dashboard → Left side Menu → “Buyer/Contract” option → Click on “Campaigns”.
- In the Buyer Campaigns Listing Page, go to the Act field and click the "Pages" icon button to copy the details of the Buyer Campaign.
- How To Change Mode Of Buyer Campaigns From Listing Page?
- Dashboard → Left side Menu → “Buyer/Contract” option → Click on “Campaigns”.
- Buyer Campaigns Listing Page → Mode field → Toggle Switch button “Test” or “Live”.
- How To Change The Status Of Buyer Campaigns From Listing Page?
- Dashboard → Left side Menu → “Buyer/Contract” option → Click on “Campaigns”.
- Buyer Campaigns Listing Page → Status field → Toggle Switch button “On” or “Off”.
- How To Find Which Buyer Campaigns Is On Test Or Live Mode?
- Dashboard → Left side Menu → “Buyer/Contract” option → Click on “Campaigns”.
- Buyer Campaigns Listing Page → Status field → Select Active or Inactive → “Magnifier” icon button for searching.
- How To Search List Of Active Or Inactive Buyer Campaigns?
- Dashboard → Left side Menu → “Buyer/Contract” option → Click on “Campaigns”.
- Buyer Campaigns Listing Page → Status field → Select Active or Inactive → “Magnifier” icon button for searching.
- How To Add New Buyer/Contract?
- Dashboard → Left side Menu → Publisher option.
- Publisher Listing Page → Top Right side → “Add” button.
- Fill the form → Click on the “Submit” button.
- How To Delete Buyer From The Listing Page?
- Dashboard → Left side Menu → "Buyer/Contract" option → "Buyer Listing" field.
- Buyer/Contract Listing Page → Action field → “Trash” button and you can delete Buyer permanently.
- How To Edit A Buyer From The Listing Page?
- Dashboard → Left side Menu → "Buyer/Contract" option → "Buyer Listing" field.
- Buyer/Contract Listing Page → Action field → “Trash” button and you can delete Buyer permanently.
- How To View Details Of Buyer’s Fund Balance?
- Dashboard → Left side Menu → "Buyer/Contract" option → "Buyer Listing" field.
- Buyer/Contract Listing Page → Action field → “Eye” icon button for getting details of Buyer’s Fund Balance.
- How To Change The Status Of Buyer/Contract?
- Dashboard → Left side Menu → "Buyer/Contract" option → "Buyer Listing" field.
- Buyer Status field → Select Active or Inactive → “Magnifier” icon button for searching.
- How To Search List Of Active Or Inactive Buyer/Contract?
- Dashboard → Left side Menu → "Buyer/Contract" option → "Buyer Listing" field.
- Buyer Status field → Select Active or Inactive → “Magnifier” icon button for searching.
- Can You Select Two Or More Lead Types In The Lead Type Section?
- Yes, you can select two or more Lead Types in the Lead Type section as per your requirements.
- And also each Lead Type has their different setting for Publisher, so you have to fill out each different sub section of Lead Type whatever you Selected.
- Dashboard → Left side Menu → Publisher option.
- Publisher Listing Page → Top Right side → “Add” button → Lead Type Section.
- What Types Of Fields Do You Have To Fill In The Additional Info Section?
- Dashboard → Left side Menu → Publisher option.
- Publisher Listing Page → Top Right side → “Add” button.
- Form → Additional Info.
- Here, you have to fill out different types of fields related to your Company information for example Company's Name, Address, City, etc.
- How To Get Values Of Phonebook ID Into The Call Hub Field?
- Dashboard → Left side Menu → Publisher option.
- Publisher Listing Page → Top Right side → “Add” button → Below of Personal Information form you get the Lead Type section.
- Select any Lead Type → End of section → Checked “Call Hub” field.
- Phonebooks → Select phonebook which you want to add → Get ID from URL.
- Here, you can see the example → https://prnt.sc/h7ZJ-0klqLUW.
- What Are The Required Fields For Choosing “Go High Level”?
- Dashboard → Left side Menu → Publisher option.
- Publisher Listing Page → Top Right side → “Add” button → Below of Personal Information form you get the Lead Type section.
- Select any Lead Type → End of section → Checked “Go High Level” field.
- Fill “Access Token” and “Go High Level Tags” fields.
- And also if you want to add a custom field, so you can fill the “GHL Custom Field Name” field with Value.
- How To Get The Value Of List ID Into Mailchimp Section?
- Dashboard → Left side Menu → Publisher option.
- Publisher Listing Page → Top Right side → “Add” button → Below of Personal Information form you get the Lead Type section.
- Select any Lead Type → End of section → Checked “Mailchimp” field.
- Go to your Mailchimp account → Click on "All Contacts" sub-menu under Audience menu → Settings → Audience name and Campaign defaults → Here, you can find your List ID.
- How To Get The API Key Of Mailchimp?
- Dashboard → Left side Menu → Publisher option.
- Publisher Listing Page → Top Right side → “Add” button → Below of Personal Information form you get the Lead Type section.
- Select any Lead Type → Select checkbox of “Mailchimp”.
- Go to your Mailchimp account → Top Right side→ Account & Billing → Click on Extras → API keys → Click on the “Create New Key” → get your API key.
- Can We Add More Custom Phone Burner Fields?
- Yes, you can add more Phone Burner Custom fields.
- Dashboard → Left side Menu → Publisher option.
- Publisher Listing Page → Top Right side → “Add” button.
- Phone Burner section → “PB Custom Field Name” option → End of the Phone Burner section.
- Also, you can click on the “ + ” button to create more Phone Burner custom values.
- How To Get Folder/Category ID While Adding New Publisher?
- Dashboard → Left side Menu → Publisher option.
- Publisher Listing Page → Select any Lead Type → Select “Phone Burner” → Folder/Category Field.
- Click on “ i ” icon for suggestion → Click on the link [ https://www.phoneburner.com/cm/folders/index ] → Login here, and get the Value of Folder/Category ID.
- How To Check The Duplicate Day Limit?
- Dashboard → Left side Menu → Publisher option.
- Publisher Listing Page → Top Right side → “Add” button → Below of Personal Information form you get the Lead Type section.
- Lead Type section → Select any Lead Type Name → Duplicate Check Day Limit field.
- How To Select Duplicate Check On Email Field?
- Dashboard → Left side Menu → Publisher option.
- Publisher Listing Page → Top Right side → “Add” button → Below of Personal Information form you get the Lead Type section.
- Lead Type section → Select any Lead Type Name → "Duplicate Check On" field → Select “Email” field.
- How To Add Profit Margin In Lead Type Of Publisher?
- Dashboard → Left side Menu → Publisher option.
- Publisher Listing Page → Top Right side → “Add” button → Below of Personal information, you get the Lead Type section.
- Select any Lead Type whatever you want → Profit Margin or Publisher Payout field → Add % for percentage profit (ex. 25%).
- For a fixed price (ex. 25). You can set anyone from "Profit Margin" OR "Publisher Payout".
- How To Select Lead Type Of Publisher In The Form?
- Dashboard → Left side Menu → Publisher option.
- Publisher Listing Page → Top Right side → “Add” button → Below of Personal Information form you get the Lead Type section.
- How To Delete Publisher From The Listing Page?
- Dashboard → Left side Menu → Publisher option.
- Publisher Listing Page → Action field → Click “Trash” icon button and you can delete Publisher permanently.
- How To Edit Publisher From The Listing Page?
- Dashboard → Left side Menu → Publisher option.
- Publisher Listing Page → Action field → Click “Pencil” icon button and you can edit Publisher whatever you select.
- How To View Selected Lead Type Posting Specs Of Publisher
- Dashboard → Left side Menu → "Publisher" option.
- Publisher Listing Page → Posting Specs field → Click "Book" icon button, you get the Posting Specs of Lead Type which was selected by Publisher.
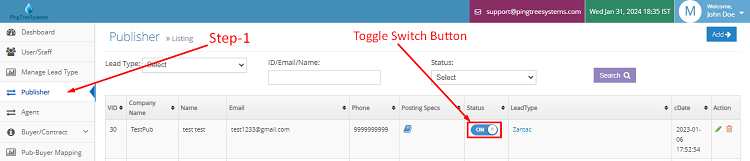
- How To Change The Status Of Publisher?
- Dashboard → Left side Menu → Publisher option.
- Publisher Listing Page → Status field → Toggle Switch button "On" or "Off".
- How Daily Lead Report Working
Here, you can get a "How to Set up Email Daily Report", then please follow these instructions.
- Go to Dashboard → Top Right corner → Click On "User Profile".
- Click on "Setting" Button → you get all setting of System.
- Here, you can see "Email Daily Report" field below the Company Name field.
- Toggle Switch button "On or Off" for activating or deactivating Daily Lead Report through Email.
- By Switching On this button, you get Daily Lead Report in the Table format on the given Email. And also, you can see the example of this Mail.

Video instructions:
- What Is Report Module
- Finally we came to the report module.
- There are 2 types of graph report, which are Pie Chart and Baar chart.
- In Pie chart, it shows full records from the start.
- In the Baar chart, it shows the last 30 days records.
- There are two types of reports, one is lead report and second is revenue report.
- You can filter your report by daterange and publisher or buyers.
- How To Send Test Lead Via Test Form
- Lead form module is also available to test lead with buyer.
- Select vid or istest checkbox to submit lead to buyer live url or test url.
- If you want to post lead into the system via ping and post then tick this checkbox.
- If you want to clear all form data then Click here.
- What Is Lead Module
- There are various lead types available. You can browse the lead listings to find what you need.
- You can view all generated leads through this module.
- Additionally, you can search for leads using various parameters such as date range, lead ID, name, email, phone number, buyer, publisher, and more.
- You can export leads as a CSV file by clicking the download button.
- Brief information is displayed on the listing page, but you can view the full lead details by clicking the view icon.
- Additionally, you can trace the complete lead transaction journey.
- This includes details such as the source of lead generation, the buyers it was posted to, the status of each interaction, responses from all buyers, processing times, and more.
- You can also delete a lead by clicking on the trash icon next to it.
- How To Upload Multiple Data Using CSV
- This is an Upload Data module, You can Upload multiple Data from this interface.
- You can select vid and leadtype to upload data and Upload a CSV file full of data.
- And then map your CSV fields to system postingspecs fields.
- What Is Publisher Login Module
- If you want to login as publisher then select publisher and then click login.
- This is a publisher login interface.
- The Publisher can upload data using CSV from here.
- You can select leadtype and Upload a CSV file full of data.
- And then map your CSV fields to system postingspecs fields.
- The Publisher can only see leadtype the superadmin has assigned.
- The Publisher can only see their lead details.
- The Publisher can also test lead using test form.
- The Publisher can see his lead report and revenue report into his login.
- How Round Robin Working
- Round robin assignment means that each new lead is assigned to a different buyer until everyone has been assigned the same amount and the cycle repeats.
For example, if you have three 4 buyers: Lead 1 is assigned to buyer 1. Lead 2 is assigned to buyer 2. Lead 3 is assigned to buyer 3. Lead 4 is assigned to buyer 4, then the cycle repeats. - You can setup round-robin for vendor wise.
- For same vendor, If any of the buyer round-robin is turn ON, then all buyer mapped to vendor will behave as round-robin.
- It works only when price 0 (zero) is set in orderby field for all mapped buyer.
- It will work when vendor direct post and buyer ping/post and direct post.
- Furthermore, it will not work when vendor post data to system using ping/post URL.

- Round robin assignment means that each new lead is assigned to a different buyer until everyone has been assigned the same amount and the cycle repeats.
- How To Create Publisher Buyer Mapping
- This is a Publisher Buyer Mapping module, You can add, edit and delete Publisher Buyer Mapping from this interface.
- This is a key module of the system that controls publisher and buyer lead posting.
- Suppose you want to pause or resume any mapping then you set mapping status to active or inactive.
- You can search pubbuyermap with different parameters like leadtype, vid, buyer, buyer setup and status.
- You can directly open the publisher, buyer and setup edit page, just click on this link.
- You can map publisher and buyer from here by clicking on the add button.
- Select leadtype, publisher, buyer, buyersetup and hit submit button.
- One more facility is available in our system that you can arrange your mapping and posting order to buyer by setting orderby number.
- How To Set Buyer Filter
-
This is the Buyer Filters section where you can efficiently manage your filters:
- Add, edit, or delete filters directly for a specific campaign.
- To set a filter, enter the filter name and click on the "Add" button then select the field, choose the operator, and enter the value.
- To apply the filter, choose "Accept" or "Reject" from the dropdown.
- If you want to set the filter for only Ping, Post, or Both then select the desired option and then click the “Save” button.
- Activate or deactivate filters by simply clicking the toggle icon.
- What Is Buyer Login Module
What Is Buyer Login Module?
- If you want to login as buyer then select buyer and then click login button.
- This is a buyer login interface.
- The buyer can only see their lead details.
- The buyer can see his lead report and revenue report into his login.
- By clicking on the Payment Setting, buyer can see fund balance and transaction details.
- Buyer add credit card details and fund from here.
- What Is Buyer Campaign ModuleThis is the Buyer Campaign Module, where you can manage buyer campaigns with ease. Here's what you can do:
- This is a buyer campaign module, You can add, edit and delete campaign from this interface.
- You can on or off your buyer campaign, just change the status of setup.
- You can search setup with different parameters like leadtype, buyer, mode or status.
- There is one more facility in our system that is copying your buyer campaign to create a new campaign to save your time.
- How To Setup Buyer
How To Setup Buyer?
- You can add buyer, just click on the add button.
- You can also select the payment method of each buyer, which is Auto add funds from CC and Admin manual add funds.
- Also we have duplicate check functionality, which means we do not allow one buyer to add again.
- If once a buyer is added, then the buyer gets a welcome email with their credentials.
- What Is Buyer Module
- This is a buyer module, You can add, edit and delete buyers from this interface.
- You can on or off your buyer, just change the status of buyer.
- You can see the buyer fund balance and transaction, just click on the eye icon.
- You can search buyers with different parameters like id, name, email and status.
- How To Create Offer
- This is an offer module, You can add, edit and delete buyer setup from this interface.
- You can add an offer, just click on the add button.
- There are 3 types of Payout Type which is CPS-Cost per sale, CPA – accumulator/threshold, CPL – accumulator/threshold.
- You can also set Payout Amount of offer.
- This is an example of a Post Back URL.
- How to Setup PublisherThis is the Publisher Module where you can manage your publishers effectively:
- Add, Edit, or Delete publishers directly from this interface.
- Retrieve the Postingspecs URL by clicking the book icon.
- Activate or deactivate publishers by changing their status.
- Log in as a publisher using the credentials provided.
- Select the lead types to connect with publishers.
- Activate lead types and set a profit margin for each.
- Enable duplicate checks based on email, phone, Universal Lead ID, and Trusted Form.
- Configure Ping Day Limit and Post Day Limit.
- Activate the Internal Blacklist and Postback URLs from the Settings page.
When a publisher is added, they will receive their login details via email. This ensures they can access the system seamlessly and start managing their activities right away.
Additionally, the system includes Duplicate Check Functionality, ensuring a publisher cannot be added multiple times.
- What Is Lead Type Module
- This is a leadtype module, You can add, manage and delete leadtype from this interface.
- You can see there are many different leadtypes.
- You can add the purchase new leadtype just, click on “Add” button on the top right corner.
- You can also manage your leadtype, click on “Manage” button.
- You can set your posting method, which is Ping-Post and Only Post.
- You can add or delete your Additional Fields, just click “Add More” or “Remove” button.
- Listing checkbox means, if you tick this checkbox then this field shows in lead listing.
- Filter checkbox means, if you tick this checkbox then this assign for filter of buyer setup integration.
- There are two types of Required checkbox, which is Ping Required and Post Required.
- If you tick ping required checkbox then, when you ping to system then this field is required.
- If you tick post required checkbox then, when you post to the system, then this field is required.
- All the fields are displayed in leadtype postingspecs.
- How To Copy Embedded Iframe Code
- This is a leadtype module.
- You can active or inactive your leadtype, just change status of leadtype.
- There are 3 types of embedded iframe code which is Simple Form, Step Form and Multi Step Form.
- If you want to show a sample form, then hover on the icon.
- Can not use iframe code, if leadtype is inactive. It shows a “Page Not Found” message.
- If you want to use it then setup your leadtype.
- If you want to use it, click on the code icon then the code embedded in the popup will show.
- You can just copy and paste this iframe and put your website so the form is automatically shown, just like this.
- How To Setup Google Sheet
- If you want to send leads into Google Sheet then use this feature.
- To use this feature then add Client ID, Client Secret ID and Refresh Token.
- To Get Refresh Token then click on Get Refresh Token link.
- Copy Refresh Token text from the new page then paste into Refresh Token textbox.
- How To Setup SMS IntegrationIf you want to send leads via SMS, you can use this module:
- There are two methods available: Twilio or ClickSend.
- Simply enter the valid credentials for the selected service in the provided fields.
- One is Twilio and the other is ClickSend.
- If you do not wish to enable this feature, select the "Not needed now" radio button to disable it.
- How To Setup Stripe Payment And SendgridYou can configure your Stripe Payment Gateway from the system settings:
- Activate or deactivate Stripe functionality.
- Choose between live or test modes for Stripe.
- Add your Stripe secret key and publishable key.
- Use this module to send leads via email.
- Configure your SendGrid API key, name, and email for verification.
- If you prefer not to use SendGrid, you can leave the settings unchanged.
- What Is User Module
- You can see superadmin and admin list of the system.
- The system has only one superdamin and others are admin.
- SuperAdmin has full access of the system and admin has limited access assigned by superadmin.
- You can add many admin of the system and assign access.
- Dashboard Module
- After logging in, the dashboard displays an error related to publishers and provides a summary of lead reports categorized by each lead type.
- On the left side, you will find menus for each module essential to the system's operation.
- First is the User module, where you can add and edit users as superadmin or admin to manage the system on your behalf.
- Login Module
- There are 3 types of role, SuperAdmin, Publisher and Buyer.
- If you are admin then login as SuperAdmin.
- If you are a publisher then login as Publisher.
- If you are a buyer then login as Buyer.